
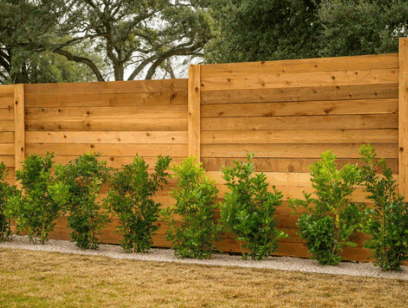
Garden fences don’t just look great – they give you security and privacy. Installing one is easy, but needs planning.
- First step: figure out why you need the fence.
- Then pick materials for your needs.
- Get the tools and equipment you need.
- Measure the area – this tells you how much material you need.
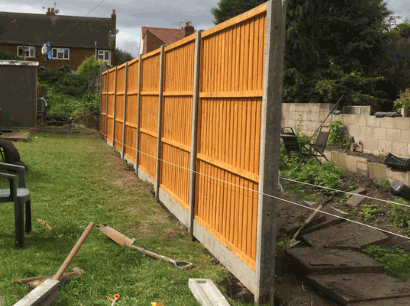
You need to dig post holes. Use a post-hole digger. Put the posts in the ground – make sure they’re level. Secure them with concrete or gravel. Let it dry.
Attach horizontal rails between your posts. Use screws or nails. Put your chosen fencing material on the rails. This could be wood panels, wire mesh, or even vinyl panels.
Secure the fencing material. Make sure it’s tight and aligned all the way along the fence.
For centuries, fences have been used for different reasons. From demarcating boundaries, and protecting crops, to making properties look nice. Fences have always been part of landscaping designs.
Now you know how to install a garden fence. Get started and soon you’ll have a beautiful fence around your outdoor space. Enjoy the added security and privacy – with this DIY project, you can also improve the look of your garden!
Explore further: How To Install Pool Fencing DIY
Benefits of Installing a Garden Fence
Installing a garden fence comes with great benefits. Such as:
- Enhancing security and keeping trespassers away
- Providing privacy for a peaceful outdoor experience
- Defining property boundaries and adding aesthetic appeal
- Protecting plants from wildlife and strong winds
Moreover, it can create designated areas for pets or kids, reduce noise pollution, and serve as an investment for property value. To make the most out of it:
- Pick the right materials – wood or metal that suit the style and climate.
- Determine the height – depends on security and privacy.
- Install correctly – secure posts and foundations.
- Maintain regularly – inspect for damages and replace if needed.
By following these suggestions, you’ll enjoy the benefits and ensure your garden fence is a useful asset for years to come.
Assessing the Area and Materials Needed
Measuring the perimeter is key for success when installing a garden fence. Use a measuring tape or laser rangefinder to get an accurate estimate of the materials needed. Consider your needs and preferences when deciding fence height. Look for slopes, uneven surfaces, and obstacles that may affect installation. Choose a durable, weather-resistant material like wood, vinyl, metal, or composite. Check local building codes for regulations on height and design. If unsure, seek professional advice. Also, take safety measures during construction. The American Garden Association reported an impressive 46% increase in gardens being fenced in their ‘Gardening Trends 2021’ survey.
Preparing the Ground
To prepare the ground for your garden fence installation, begin by removing obstacles and clearing the area. Then, focus on measuring and marking the fence line. These steps will ensure a smooth and accurate installation, allowing you to enjoy a sturdy and attractive garden fence.
Removing Obstacles and Clearing the Area
Removing obstacles and clearing the area is a must before starting any project. By doing so, we create a space ready for progress. Identifying and getting rid of anything that might block success is key.
Physical barriers can include clutter or huge objects that need to be moved. Clearing them allows for a safe and useful environment.
Mental and emotional blocks can also hinder progress. These could be self-doubt, fear of failure, or negative thought patterns. Overcoming these internal blocks helps create an open mindset for action.
Measuring and Marking the Fence Line
Measuring and marking the fence line is essential before starting your project. It creates accuracy and a solid foundation for a good fence. Here is a 6-step guide:
- Assess boundaries. Identify the desired boundaries. Think about property lines, current structures, and any regulations that could apply.
- Gather tools. Get a measuring tape, stakes, string, and marking spray paint. They will help with accurately marking the fence line.
- Measure and mark each corner. Start at one corner. Use the measuring tape to determine the distance, then place a stake. Repeat this for all corners, making sure they are aligned with your measurements.
- Set up intermediate points. For longer fence lines, create points between corners to stop sagging or unevenness. Measure equal distances and mark with more stakes.
- Stretch string along marker stakes. Connect string or twine tightly across the stakes – from one end of the fence line to the other. This will show you where to dig post holes and install the fencing.
- Double-check measurements. Use a level or plumb line tool to make sure everything is accurate.
Remember to contact local utility companies to check for underground cables or pipes. Get going and enjoy the peace of mind that comes with a correctly installed fence!
Choosing and Installing Fence Posts
To ensure a sturdy garden fence installation, adopt this guide on choosing and installing fence posts. Selecting the right type and size of fence posts, as well as digging and setting them firmly into the ground, are key considerations to guarantee a successful fence project.
Selecting the Right Type and Size of Fence Posts
When selecting fence posts, there are some factors to think about. They include the type of fence, the climate, and the purpose.
To help decide, check out this post type and size table:
| Fence Post Type | Size (inches) |
|---|---|
| Wood | 4×4, 6×6 |
| Metal | 1.875 |
| Vinyl | 5×5 |
| Concrete | Varies |
Wood posts are popular. They come in 4×4 and 6×6 inches. Metal posts are 1.875 inches and are tough. For low maintenance, vinyl posts are 5×5 inches and resist rotting and termites. Concrete posts vary in size and are great for harsh weather.
Sometimes there are building codes that specify post type/size. Be sure to check those before choosing. Did you know that fence posts have been around since 3500 BC? Ancient Egyptians used wooden pilings then. People have long needed privacy and protection!
Digging and Setting the Fence Posts
Digging and setting fence posts is very important for constructing a fence. Three steps can help you do it right:
- Mark post-hole locations: Put fence posts in the right spots along the boundary line. Make sure they are evenly spaced and aligned.
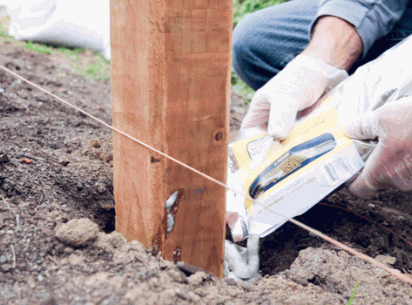
- Dig post holes: Use a digger or auger to make holes one-third the length of the posts. Depth depends on soil and climate.
- Set the posts: Insert posts and make sure they’re vertical and level with other posts. Fill the hole with concrete or tamped soil.
It’s important to consider other things like frost line depth, local building codes, and materials.
Historically, Egyptians used stone walls as fences around their fields in 3100 BC. They put slabs deep in the ground for stability—showing how essential it is to dig and set posts well for a successful fence.
Attaching Fence Panels or Boards
To properly attach fence panels or boards, with a focus on choosing the right ones and securing them to the posts, follow these guidelines. Selecting suitable fence panels or boards is crucial for a sturdy and appealing fence. Once you’ve made your choice, it’s time to securely attach them to the posts.
Choosing the Fence Panels or Boards
Picking the right fence panels or boards can have a big impact on your fence’s aesthetics and usefulness. Keep these key points in mind when selecting them:
- Material: This is important for durability & appearance. Possible materials are wood, vinyl, metal, and composite.
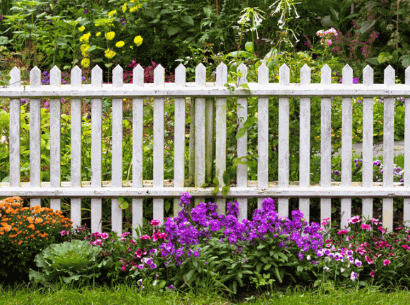
- Style: Consider your home & landscape when deciding. From classic picket fences to modern slat designs, there’s plenty to choose from.
- Height: Take into account your privacy wants & local laws. Taller ones give more privacy but may seem overpowering. Shorter ones create a welcoming feel.
- Maintenance: Analyze the maintenance demands of different material types before deciding. Some need regular painting or staining, while others need little care.
Additionally, consider the details of each panel or board that go beyond the general guidelines. Research any special installation needs or additional features that could affect compatibility with existing posts or structures.
When attaching Fence Panels or Boards, the right ones are essential. With so many options, being informed about materials, styles, heights, & maintenance requirements will help you make the ideal decision for your property. And let’s not forget the long history that these crucial elements have!
Attaching the Panels or Boards to the Posts
- Positioning: Line up the first panel or board with the post. Make sure it’s level and plumb. Use a spirit level for accuracy.
- Fastening: Secure the panel or board to the post with nails or screws. Use enough fasteners to hold the panel firmly in place.
- Spacing: Keep consistent spacing between each panel or board. Use spacers or measuring tools to get exact spacing.
- Reinforcement: Add support to your fence panels if needed, especially in areas with strong wind or heavy impact. Add diagonal braces or cross supports for stability.
Positioning and fastening are key to avoiding misalignment and panel movement over time. Proper spacing makes your fence look nice while reinforcement strengthens the structure.
By following these steps, you can attach your fence panels or boards to the posts securely. You’ll create a strong and attractive fence that lasts for years.
Adding Gates and Gate Hardware
To facilitate the process of adding gates and gate hardware to your garden fence, we provide you with a comprehensive guide. Selecting and installing the gate and installing gate hardware for security and convenience are the two solutions we will explore in this section. Let’s dive in and make your garden fence complete and functional.
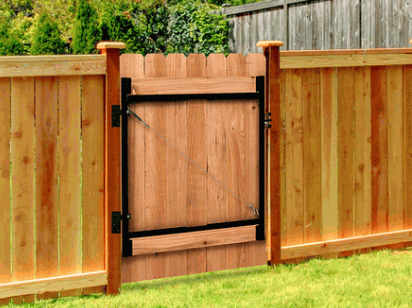
Selecting and Installing the Gate
When selecting and installing a gate, there are crucial factors to consider. Get the right choice with this step-by-step guide:
- Assess needs: Why is the gate needed? Security, privacy, aesthetics? What size and style fit your property?
- Measure and plan: Measure the area where the gate will go. Make sure it opens without obstacles.
- Choose material: Pick from wood, metal, or vinyl. Think about durability, maintenance, and weather resistance.
- Pick reliable hardware: Quality hardware, like hinges, latches, handles, and locks, should match the gate material.
Also, check local regulations and codes. These steps help you find the right gate for your needs and enhance your property.
Improve security and appeal! Enjoy peace of mind knowing that you have a valuable gate that lasts. Take action today.
Installing Gate Hardware for Security and Convenience
When it comes to gate security and convenience, installing the right hardware is key. It offers added protection and easy access. To install gate hardware, these four steps can help:
- Choose a lock. Opt for maximum security and ease of use: keyless entry systems or combination locks.
- Align and attach hinges. Ensure they’re robust enough to handle the weight of the gate and enable easy swinging.
- Add a self-closing mechanism. Keeps the gate closed, great for pets and kids.
- Install a latch system. Secure and easy to open with one hand.
Plus, consider extra details to improve gate functionality and durability. Apply weather-resistant coatings to metal, and lubricate hinges and locks for proper functioning.
Gate hardware has a rich past. Ancient civilizations used them as symbols of power. Nowadays, advancements in tech have given rise to smarter and more convenient options.
Investing in quality materials and following installation methods, gates, and hardware can create peace of mind. Enjoy security and convenience with comprehensive installation and attention to detail.
Finishing Touches and Maintenance
To achieve the desired finishing touches and ensure the longevity of your garden fence, address the section of ‘Finishing Touches and Maintenance’ in your installation process. Explore solutions like painting or staining the fence and implementing proper maintenance techniques for optimal results.
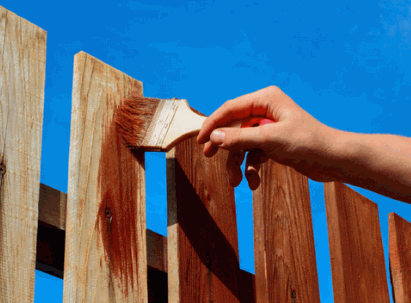
Painting or Staining the Fence
Painting or staining your fence is a must-do when it comes to its finishing touches and maintenance. It gives your fence a new look and provides extra protection from the weather. Plus, it makes your fence more durable and less likely to rot, warp, or be eaten by insects.
It’s best to use paint or stain formulated specifically for fences. Ask a professional or do some research to pick the right one.
Don’t miss out on these benefits! Make time in your schedule for this task, get the materials you need, and start transforming your fence into an eye-catching feature. Go ahead and do it now – you won’t regret it!
Proper Maintenance of the Garden Fence
Maintaining a garden fence is key for its strength and good looks. To make sure your fence holds up and looks great, follow these 5 steps:
- Inspect the fence often for any signs of damage such as loose boards or broken panels. Address any issues quickly to stop further damage.
- Clean the fence often by clearing away dirt, debris, and mildew with a mild detergent and water. Use a brush or sponge to scrub gently.
- Apply a protective finish every two to three years. This helps protect it from the elements and extends its life. Choose a finish that matches your fence material. For example, stain for wood and sealant for metal.
- Trim nearby vegetation to prevent it from leaning onto the fence or causing damage. Keep plants away from the fence as they can promote moisture and decay.
- Be aware of nearby construction projects that may harm the fence. Take precautions like placing barriers or talking to contractors to let them know where the fence is.
In addition, think about adding features like flower boxes or decorations to make your garden fence look even better.
By following these steps and staying alert to your fence’s condition, you can keep it strong, attractive, and effective for years.
Conclusion
Crafting a garden fence requires much more than just physical labor. To ensure your fence is successful and long-lasting, go through the steps detailed in this article! From choosing materials to measuring and marking boundaries, every step is essential.
Plus, there are unique details you need to consider. Think of local regulations and neighborhood guidelines when it comes to fence height and style. Add trellises or decorative designs for an attractive look.
HomeAdvisor.com says that a well-made garden fence delivers privacy and security—plus, it adds value to your property. Invest in a quality fence and enjoy its benefits for years!
When installing a garden fence, remember to plan and execute carefully. Utilize the advice here and adhere to industry best practices. With the right approach, you can have a secure and beautiful garden enclosure!


